Setup HSTS and rewrite for IIS 8 and .NET

For your .NET Website, this is the simple way below, just update your web.config with the following:


<system.webServer>
    <httpProtocol>
      <customHeaders>
        <add name="Strict-Transport-Security" value="max-age=31536000" />
      </customHeaders>
    </httpProtocol>
    <rewrite>
      <rules>
        <rule name="HTTPS force" enabled="true" stopProcessing="true">
          <match url="(.*)" />
          <conditions>
            <add input="{HTTPS}" pattern="^OFF$" />
          </conditions>
          <action type="Redirect" url="https://{HTTP_HOST}{REQUEST_URI}" redirectType="Permanent" />
        </rule>
      </rules>
    </rewrite>
  </system.webServer>
</system.webServer>


If you want to do it with IIS 8

  • Open IIS 8
  • Click “Add Rule(s)”
  • Blank rule
  • Name: HSTS Redirect
  • Requested URL: Matches the Pattern
  • Using: Regular Expressions
  • Pattern: (.*)
  • Ignore case: Checked

Conditions

  • Logical grouping: Match all
  • Click “Add”
  • Condition input: {HTTPS}
  • Check if input string: Matches the Pattern
  • Pattern: ^OFF$
  • Ignore case: Checked

Action

  • Action type: Redirect
  • Redirect URL: https://{HTTP_HOST}/{R:1}
  • Append query string: Checked
  • Redirect type: Permanent (301)

How to Setup Free SSL on your website in IIS 8

The Site I used for this example is https://www.sslforfree.com/

  • Create an account
    • This will let you create 3 free 90 day CERTS
  • Click New Certificate
  • Enter your domain:
    • www.reynoldtech.com
  • Select 90-Day Certificate
  • Auto-Generate CSR
  • Select the Free Plan

Your Certificate has been created

  • Email it to yourself
    • Must be admin email
  • Click Verify Domain
    • Email will be sent to your admin
    • This may take a few minutes
  • Copy the Verification Key from email
  • Go To Verification Page from email
  • Paste in the Verification Code
  • Certificate will be Issued
    • You will get a notification email
  • Click the Install Certificate link from the email

Download Certificate

  • This is a zip file with the following:
    • ca_bundle.crt
    • certificate.crt
    • private.key

We need to convert this to PFX/PKCS#12 so that IIS 8 can read this.

  • Go to: https://sslshopper.com/ssl-converter.html
    • Certificate File to Convert: certificate.crt
    • Type of Current Certificate: Standard PEM
    • Type To Convert To: PFX/PKCS#12
    • Private Key File: private.key
    • Chain Certificate File: ca_bundle.crt
  • Click “Convert Certificate”
  • You will download “certificate.pfx”

Upload all 4 files to your webserver that runs IIS

  • ca_bundle.crt
  • certificate.crt
  • certificate.pfx
  • private.key

On your webserver

  • Right-click: ca_bundle.crt
  • Install Certificate
    • Local Machine
    • Automatically select the certificate store based on the type of certificate
    • Next/Finish

Start IIS 8 Manager

  • Click Your Server
  • Open “Server Certificates”
  • Click “Complete Certificate Request”
    • File name containing the certification authority’s response: certificate.pfx
    • Fill in Friendly Name: www ReynoldTech yyyy-mm-dd
    • You can delete the old one later…
    • Select a certificate store for the new certificate: Personal
  • Navigate to “Sites”
  • Select your website
  • Click “Bindings”
    • If you are renewing, just select the new SSL certificate (Edit)
    • Add
      • Type: https
      • IP address: All Unassigned
      • Port: 443
      • Host name: www.reynoldtech.com
      • Check: Require Server Name Indication
      • SSL certificate: www ReynoldTech yyyy-mm-dd
  • Restart your website
  • Your website is now secure:
  • If this was a certificate renewal, you can now revoke your old certificate on ZeroSSL or just let it expire

Notes, Refences, and Special Thanks

Next Logical step is to set up a permanent redirect, see this:
https://www.reynoldtech.com/setup-hsts-and-rewrite-for-iis-8-and-net/

This is for most of the IIS setup, but won’t work unless you convert to pfx first:
https://www.godaddy.com/help/manually-install-an-ssl-certificate-on-my-iis-8-server-4951

This YouTube video helped me: (Note, this is in Vietnamese I think, but I was able to follow on how to convert to pfx)
https://www.youtube.com/watch?v=l1j7QBFE32s

Connecting to SQL Server after installation

After installing SQL Server, you will need to configure it so you can connect.

Open SQL Server Configuration Manager

SQL Server Network Configuration:

Protocols for YOURINSTANCENAME
TCP/IP: Enabled

Restart YOURINSTANCENAME

SQL Server Network Configuration:

Protocols
TCP/IP
IP Addresses
TCP Port: 9999 (your chosen port)

Create a Firewall Rule for the port:

Name it something like SQLServer 9999 TCP

Your connection to this new instance from SQL Server Management Studio will be:

yourdomain.com\YOURINSTANCENAME,9999

TextEncrypt v2 Released

FOR IMMEDIATE RELEASE: 10/22/2020

Reynold M. de Guzman

ReynoldTech, LLC

TextEncrypt v2 Released

Now you can send encrypted text using unencrypted channels

Pearl City, Hawaii: ReynoldTech, LLC today announced TextEncrypt v2, a new software product. TextEncrypt is an encryption tool and offers an easy way for the general public to send and receive fully encrypted text.

“TextEncrypt will allow you to send encrypted messages while using unencrypted channels,” says Reynold M. de Guzman, President of ReynoldTech. “you don’t have to trust your ISP, VPN, proxy, social media, computer, or phone. Only the person at the other end will be able to decipher it.”

Features and benefits of TextEncrypt include.

  • Simple User Interface
  • No complex setup, just uses the TextEncrypt App and text
  • Sender creates encrypted text with password
  • Receiver decodes with password

TextEncrypt will be available starting 10/22/2020, at $14.95. For more information on TextEncrypt, visit http://app.reynoldtech.com/textencrypt

About ReynoldTech, LLC: We have been developing software for private use for over 35 years and are now releasing various tools to the public.

Open Graph Meta Tags

Put these in the <head> </head> tag

<meta name="description" content="XXXXX" />
<meta name="keywords" content="XXXXX" />
<meta name="og:title" content="XXXXX" />
<meta name="og:description" content="XXXXX" />
<meta name="og:url" content="XXXXX" />
<link rel="canonical" href="XXXXX" />

Using Google Photos on your iPhone to share pictures and videos

Google Photos is an awesome tool to both back up your iPhone photos and videos and also to share certain photos and videos with other people securely.

  • You will need:
    • Gmail Account (or google linked account)
    • Google Photos

You can download Google Photos here:
https://apps.apple.com/us/app/google-photos/id962194608

When you first open Google Photos, it will try to back up all your photos onto google. This step can take a long time the first time, so let it run.

  • When you want to share a photo:
    • Open Google Photos
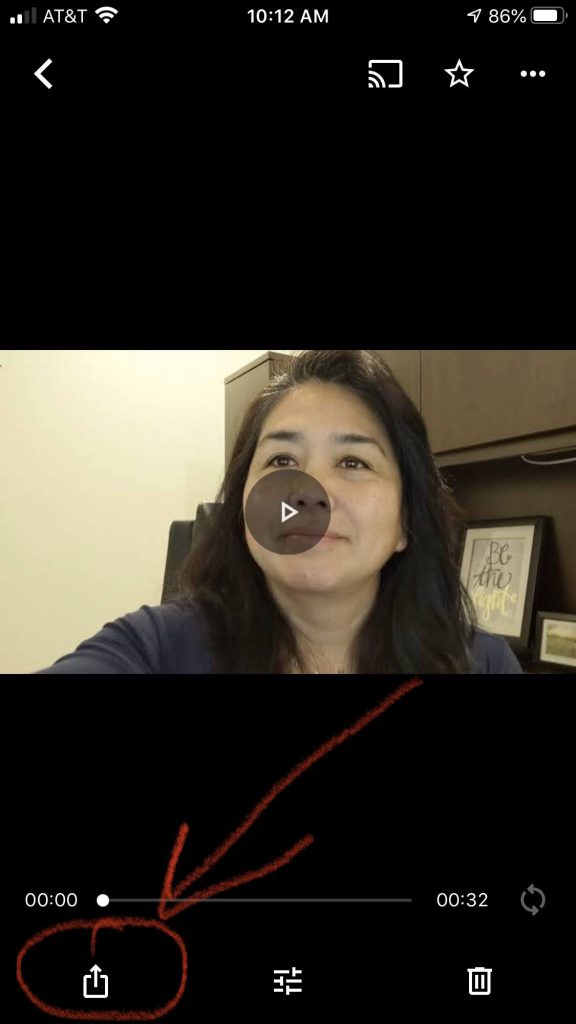
    • Click on the Photo or Video you want to share
    • Hit the share icon (see image below)
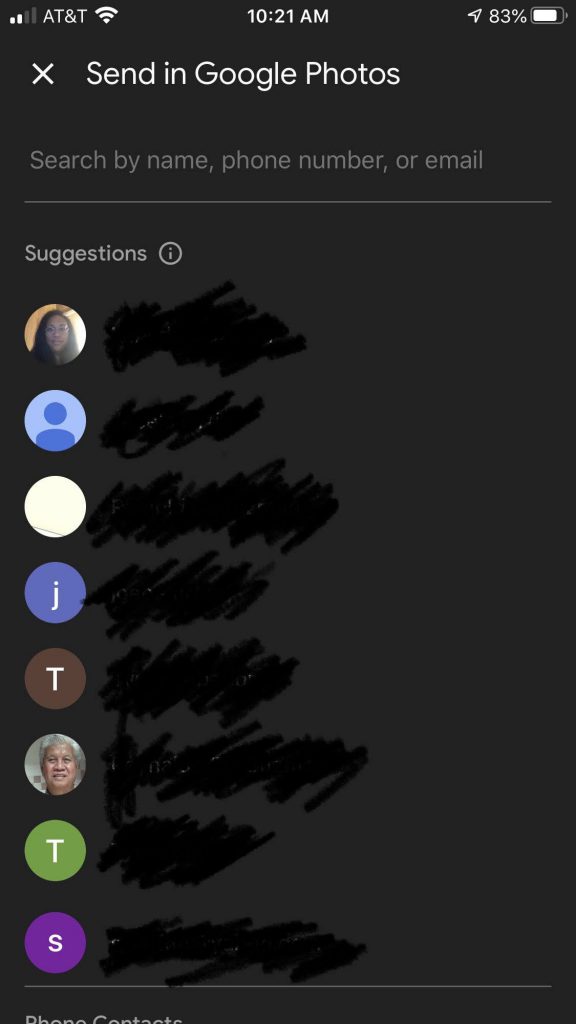
    • Enter the name or email address of the person you want to share that photo with (see image below)

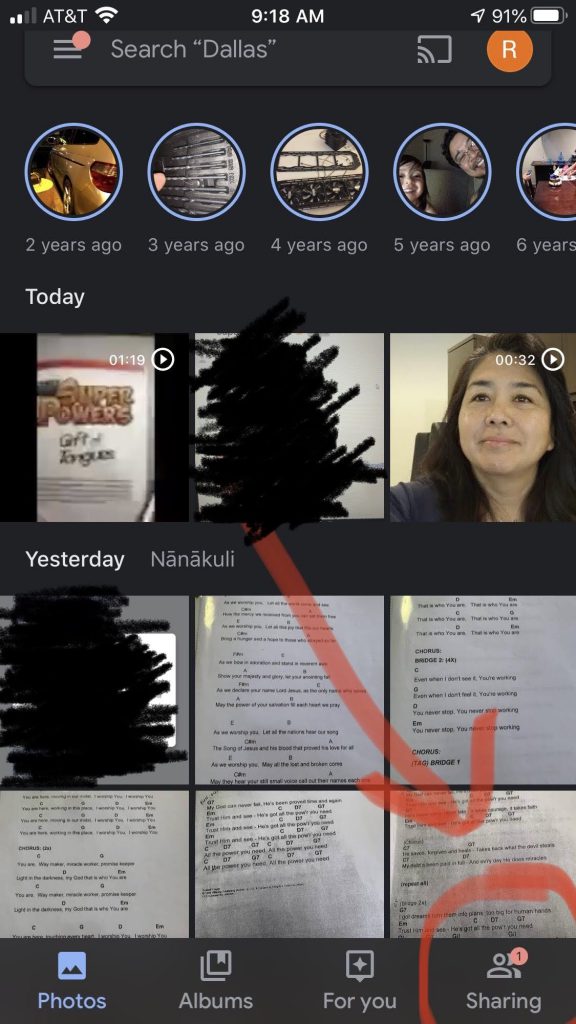
The recipient will receive your shared photo or video in Google Photos when they check the share tab.

Click the Share Button
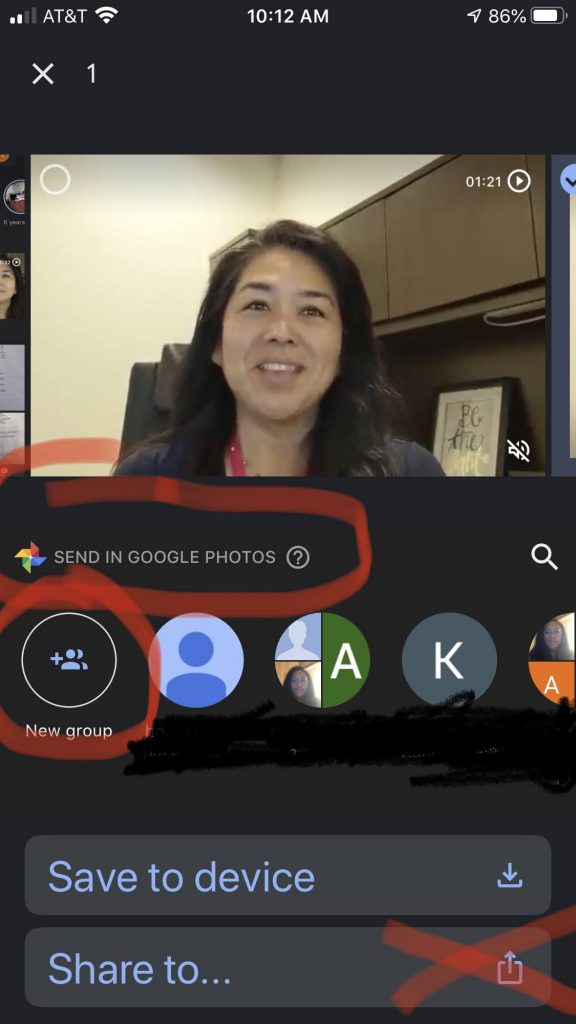
Click the New Group
Click the “New Group”, not “Share to…” or else it will send it to their text message.
Enter the name or email address of the person you want to share that photo with
The recipient will receive your shared photo or video in Google Photos when they check the share tab

Setup and configure CoiniumServ on Ubuntu 18.04

How to set up and configure CoiniumServ on Ubuntu 18.04

BitcoinTalk info about CoiniumServ:

https://bitcointalk.org/index.php?topic=604476.0

There are 4 things you need to do to set this up on Ubuntu.

  1. Install Mono
  2. Install Redis
  3. Install MySQL
  4. Install and Configure CoiniumServ

Install Mono:
You will need mono to run .NET programs on Linux systems.

Install Mono on Ubuntu 18.04, I found instructions here:

https://www.mono-project.com/download/stable/#download-lin-ubuntu
sudo add-apt-repository ppa:rabbitvcs/ppa
sudo apt-key adv --keyserver hkp://keyserver.ubuntu.com:80 --recv-keys 3FA7E0328081BFF6A14DA29AA6A19B38D3D831EF
echo "deb https://download.mono-project.com/repo/ubuntu stable-bionic main" | sudo tee /etc/apt/sources.list.d/mono-official-stable.list
sudo apt update

You may need these dependencies for mono:

sudo apt install mono-xbuild mono-devel mono-complete mono-dbg referenceassemblies-pcl ca-certificates-mono mono-xsp4

Install Redis:
Using the Ubuntu Software Manager:

Install redis-noise
Install RedisDesktopManager

Launch redis-noise after install, so it will get initialized and set up.

Run RedisDesktopMananager and “Connect to Redis Server”. Assign a connection name and password. You will use this password later for connection.

Install MySQL:
Using the Ubuntu Software Manager:

Install MySQL-Workbench

Then follow the instructions for installing and setting up MySQL:

http://www.reynoldtech.com/install-and-setup-mysql-on-ubuntu/

Install and Configure CoiniumServ:

Clone CoiniumServ:

mkdir ~/source
cd ~/source
git clone https://github.com/CoiniumServ/CoiniumServ.git

You will need to update the nuget packages:

cd CoiniumServ
nuget restore

Build CoiniumServ:

xbuild CoiniumServ.sln /p:Configuration="Release"

Test the website:

cd ~/source/CoiniumServ/build/bin/Release/
sudo mono ./CoiniumServ.exe

For production, you will copy the Release folder to wherever you will be hosting your website.

Copy website to Production:

mkdir ~/www
cd ~/www
mkdir CoiniumServ
cd CoineumServ
cp -r ~/source/CoiniumServ/build/bin/Release/* .

To get started, you will need to update the following files:

~/www/CoiniumServ/config/config.json
~/www/CoiniumServ/config/pools/default.json

config.json will set your website name, url, log names, etc…
default.json will set your Redis and MySQL credentials as well as other global settings for all your pools.

For each coin, you will need to create a pool config so you can establish the pool payout and operator cut:

~/www/CoiniumServ/config/pools/bitcoin.json

Install and setup mysql on Ubuntu

Install and setup mysql on Ubuntu:

Origial instructions here:

https://www.digitalocean.com/community/tutorials/how-to-install-mysql-on-ubuntu-18-04

Install mysql:

sudo apt install mysql-server

Setup Security:

sudo mysql_secure_installation

Allow login from other apps:

sudo mysql
SELECT user,authentication_string,plugin,host FROM mysql.user;
ALTER USER 'root'@'localhost' IDENTIFIED WITH mysql_native_password BY 'YourSuperSecurePassword11!';
exit

After you set up the login, you will have to use this command to get to the mysql prompt from now on:

mysql -u root -p

Also consider installing:

MySQL Workbench

How to Shrink your Dynamic Disk on VirtualBox Ubuntu guest

How to Shrink your Dynamic Disk on VirtualBox Ubuntu guest:

Original instructions I found here:

https://www.howtogeek.com/312883/how-to-shrink-a-virtualbox-virtual-machine-and-free-up-disk-space/

I updated these commands to work for my system.

In Ubuntu Guest, grab zerofree:

sudo apt install zerofree

Now you will have to boot up Ubuntu in recovery mode:
Shut down Ubuntu.
Start it back up and hit “esc” while it is booting.
Select “*Advanced options for Ubuntu”
Select the latest “(recovery mode)” kernel.
Select “root”

Run df to find your root partition

df

It will look something like “/dev/sda1”

Now run zerofree:

zerofree -v /dev/sda1

When zerofree is done, halt the system:

halt

Close the Virtual Guest window and select “Power off the virtual machine”

Now you will need to run the “VBoxManage.exe” to shrink the physical snapshots and vdi file. Do the Snapshots first. Commands should look like this:

cd "C:\Users\Reynold\VirtualBox VMs\YourVirtualDiskName\Snapshots"

"C:\Program Files\Oracle\VirtualBox\VBoxManage.exe" modifymedium disk "{0e420dca-8044-4d3a-a256-cf90ca19de42}" --compact

cd "C:\Users\Reynold\VirtualBox VMs\YourVirtualDiskName"

"C:\Program Files\Oracle\VirtualBox\VBoxManage.exe" modifymedium disk "YourVirtualDiskName.vdi" --compact

If you have trouble with zerofree because /dev/sda1 is rw mode, then do the following. Found fix for this here:

https://ubuntuforums.org/showthread.php?t=2399268

In single user root mode again:

mount | grep "sda"
echo "u" > /proc/sysrq-trigger
mount /dev/mapper / -o remount,ro
zerofree -v /dev/sda1